 One of my favorite things to eat when I would visit my grandparents in Chinatown growing up was char siu or barbecue pork. The strips of pork hung in the windows and my family would eat them for lunch over rice and noodles. I’ve been on a mission to make barbecue pork at home that is nutrient dense without gluten, dairy and processed ingredients. Here is the recipe and share photos of the barbecue pork on Instagram with tag #chineseporkwednesday.
Ingredients
- 4 pounds boneless pork shoulder (pastured and local if you can get it)
- 3/4 cup coconut aminos
- 1/2 teaspoon five spice powder
- oil, fat, or coconut cooking spray
- salt
- white pepper
Equipment
- half sheet cookie baking pan
- baking rack
- non-stick pan
- silicon basting brush
- aluminum foil
- raw meat cutting board
- cooked meat cutting board
- knife
Method Preheat the oven to 425 degrees. Place the pork shoulder on the cutting board.
 Slice the pork shoulder into slabs that are 1/2 inch thick.
 Cover the baking pan with aluminum foil. Place the baking rack on top. Spray the rack with the cooking spray or brush oil/fat on with the silicon brush. Place the slabs of pork on the rack.
 Sprinkle salt and white pepper on both sides of the meat.
 Place the tray of meat in the oven. Cook the meat for 15 minutes on each side. Set the timer.
 After you have placed the meat back in the oven to cook for the second 15 minutes, put the stove on medium and pour in the coconut aminos and five spice powder.
When the liquid starts to bubble turn the low so that the liquid starts to thicken.
Once the liquid is covered with bubbles, stir slowly with the silicon brush.
 While you are making the barbecue sauce, the meat will finish cooking. Take it out of the oven and set aside to cool.
 The sauce will be ready a couple minutes later. Is ready when it has thickened to the point you stir it with the brush and it takes a couple seconds for the liquid to come together.
 Place the meat on the cutting board. I use my wooden cutting board to cut non-raw food. Brush the meat with the sauce.
 Cover both sides of the meat and the edges with the sauce.
 Barbecue pork is ready. Slice and serve!
The Dumpling Mama xo
 My girls get so excited when I make these eggplant medallions. They will eat them by themselves, on top of (gluten-free) pasta, on top of rice. I make a big batch because they make great left-overs.
 Heat the skillet over medium heat. Cut the eggplant into 1/2 inch thick medallions.
 Setup 3 bowls for the crust.
 Cover the bottom of the pan with oil or fat, about 1/4 cup. I use ghee because it is mild with little flavor.
 Take one of the eggplant medallions and cover it with the arrowroot mixture in bowl 1.
 Then dip the medallion into the egg mixture in bowl 2.
 Finally dip the medallion into the almond flour and sesame seed mixture in bowl 3.
 Oil or fat should be hot by now. If you are unsure, splash a few drop of water into the oil and it should pop. Cover both sides of the medallion with oil by dropping one side into the oil then flip it over and place the other side on the pan.
 Wipe the leftover crumbs out of the pan with a paper towel. Heat 1/4 cup of oil or fat into the pan. Repeat the coating and pan-frying process until you’ve cooked all of the medallions. 3 – 4 batches, 18 – 24 medallions.
 The egg mixture in bowl 2 can get thick and gooey. After coating the second batch, replace it with a new egg mixture of 2 eggs.
 This recipe makes a big batch. Store in the refrigerator or freezer and re-heat in the toaster oven. Enjoy!
 I made this noodle dish for every BBQ this summer and it was a big hit. This recipe is a Chinese spin on the Korean glass noodles dish, japchae. I love these noodles because there is a ton of vegetables.
 I love to cook with these noodles because they are gluten free.
 At least 3 hours before you make the noodles, soak the dried shiitake mushrooms in water.
 Once you are ready to cook, squeeze the excess water from the mushrooms.
 Fill the stock pot with water and start boiling on medium high.
 Turn your skillet or wok on medium and add in 1 tablespoon of oil/fat. I used duck fat to cook these noodles. Once hot, add the onions and cook until translucent. Then add the peppers, 1/2 teaspoon of salt, and cover. After 4 minutes open the cover and stir the vegetables. Cook until vegetables are soft, about 8-10 minutes.
 Place the vegetables and its juices onto a plate. The juice will give flavor to the noodles. Keep this stove burner on the whole time you cook the vegetables, mushroom, and eggs. You’ve already cut everything up so you will cook everything one right after another.
 In the same skillet or wok, heat 1 tablespoon of oil or fat. Put in the shredded carrots and 1/4 teaspoon of salt. Cook uncovered until soft, about 5 minutes. Stir while cooking. Place cooked carrots onto the plate with the peppers and onions.
 Clean the baby spinach. In skillet or wok, heat 1 tablespoon of oil or fat. Put in the garlic and cook for 30 seconds until the ends turn light brown. Put in the spinach and 1/4 teaspoon of salt. Stir and cook until starting to wilt, about 2 minutes. Place the spinach on the plate.
 In the skillet or wok, heat 1 tablespoon of oil or fat. Put 1/4 cup of scallions and cook for 30 seconds to flavor the oil. Put in the shiitake mushrooms and 1/4 teaspoon of salt. Stir and cook until hot, about 3 minutes.
 Place the mushrooms on the plate.
 In the skillet or wok, heat 3 tablespoons of oil or fat. Put in the eggs and 1/4 teaspoon of salt. Lightly scramble and place on a separate late.
 Place all of the cooked vegetables and mushrooms and the rest of the raw scallions on top of the noodles.
 Mix the coconut aminos, fish oil, and 1 teaspoon of salt and pour into the pot.
 Use 2 sets of chopsticks or hands to thoroughly mix everything together.
 Give the noodles a taste. To make them more savory add salt and fish sauce. If they need to be sweeter, add some coconut aminos.
 Once the noodles are perfect. Add the lightly scrambled eggs on top.
 Salmon is one of the easiest meals to make. It seasons easily. It cooks quick. The hardest part is you have to cook it quick because it won’t keep in your refrigerator. My mom likes to make this salmon dish when we eat BBQ to contrast all of the grilled food.
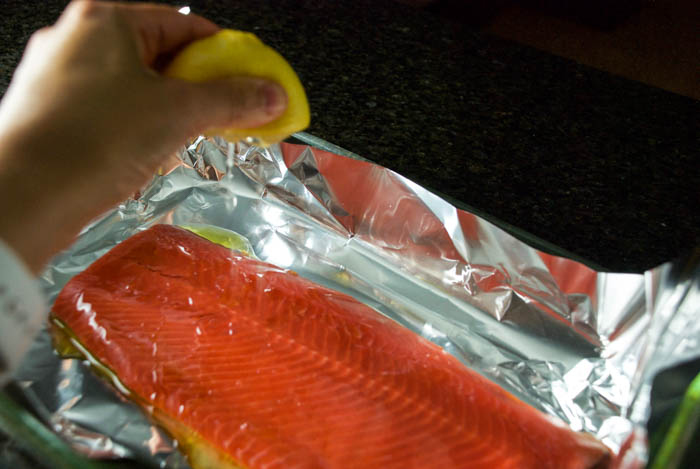 Preheat the oven to 350 degrees. Line the baking dish with aluminum foil and place the fish in the pan. Cover the fish with lemon juice, olive oil, 1/2 teaspoon salt, 1/2 teaspoon white pepper. Put the fish in the oven for 15 minutes (20 minutes if fish is thick).
 Chop the scallions, garlic, and ginger slices.
 To prepare the sauce, in a small pot or pan, heat up the fat/oil on medium heat. When it is hot, put in the ginger and garlic. They should instantly sizzle when they hit the fat/oil. Let them flavor the fat/oil for 1 minute and should not turn brown.
 Add in the coconut aminos, fish sauce and sesame oil and let simmer for another 1 minute. Add the scallions, 1/2 teaspoon salt, 1/2 teaspoon white pepper and after 1 minute, turn off the heat.
 After 15 minutes, take the fish out of the oven.
 Spread the ginger and scallion sauce over the baked fish and serve!
 Dice 1-1/2 cups of scallions, green and white parts. Put them in a pile on a large plate.
 Shred 2 cups of carrots. Put them in a pile next to the scallions on a large plate.
 Dice 2 cups of mushrooms. Use shiitake, button, or portobello. Put these also in a pile on the large plate.
 Dice 2 cups of a green vegetable like asparagus. You can also use peas. I like to have at least 3 different vegetables (not counting scallions). Put them in a pile on a large plate.
 Dice 12 pieces of bacon. I keep these on the cutting board.
 Crack 5 eggs and 1/4 teaspoon of salt in a bowl and beat until scrambled.
 Melt 2 teaspoons of ghee. Cook the scrambled eggs. Put them in a bowl (I use the bowl they were scrambled in). Scrape all the egg out of the skillet or wok.
 Use a knife to cut the egg into smaller pieces.
 Cook the diced bacon for about 4 minutes.
 Remove the bacon before it gets too crispy. Bacon should be soft and crispy on the ends.
 To cook the vegetables you are going to follow these same 4 steps:
 3. Throw in 2 cups of the vegetable and 1/4 teaspoon of salt. Cook 3-4 minutes until soft.
 Cook the green vegetables with the 4 steps.
 Cook the mushrooms with the 4 steps.
 As you cook the vegetables put them back in piles on the plate.
 The rice should be cooked now. Stir it slowly to fluff and loosen from the side of the pot.
 Melt a teaspoon of ghee and cook the rest of the scallions for 15 seconds. Put in the rice and 1/2 teaspoon of salt. Mix together for 30 seconds.
 Put in the egg, bacon and vegetables on top of the rice.
 Mix everything together. If I’m using a skillet, I’ll use 2 large spoons to mix. If I’m using a wok, I’ll use a wok spatula.
 Pour in the 2 tablespoons of coconut aminos and 1 tablespoons of fish oil. Thoroughly mix with the rice. You can replace the coconut aminos and fish oil with 2 tablespoons of soy sauce.
 I’m old school when I cook rice. It was the first thing my grandmother taught me to cook. I cook it in a stainless steel pot. I’m not comfortable with the off-gasing of harmful chemicals boiling a plastic bag of rice in water. Non-stick freaks me out so I don’t use a rice cooker because the bowls are usually non-stick. I could never tell my grandmother you can make rice by boiling it in a plastic bag, she would think I was crazy!
 In my rice bag, I store my measurement cup. It’s one of my kiddie cups and close enough to 8 oz. Whatever cup you use (measuring cup, kidding cup, etc), use it to measure both your rice and water.
 Measure 2 cups of rice.
 Pour into your pot.
 Uncooked rice is covered with starch from processing. If you don’t clean it off, it will make the rice very gluey. To clean, fill the pot with water covering the rice.
 Pick up a handful of rice and rub it between your fingers in the water.
 Use the water to get the handful of rice off your hand. Repeat this process with 3 more different handfuls of rice (total of 4 handfuls).
 Drain the water from the rice.
 Fill the pot with water again and clean 4 handfuls of rice. If the water your draining is still very cloudy, fill the pot with water and clean handfuls one last time. The water does not need to be completely clear, but you should be able to see the rice.
 Once the rice is clean, fill the pot with 2 cups of water.
 Make sure all of the rice is under the water.
 Cover the pot and cook on high.
 When the water is boiling, turn the burner to low. Steam will by coming through the lid when the water is boiling, uncover and make sure the water is fully boiling before turning to low.
 Cook for 20 minutes. Uncover and check out your perfectly fluffy rice.
 White cut poached chicken is one of the healthiest and easiest meals. It’s a
  Start with a whole chicken between 4.5 – 5 lbs. Try to buy one that is free range, organic, or recently processed (butchered) for the best taste and most nutritious. Before you start cooking the chicken leave it on the counter until it is room temperature to help the meat stay tender.
 Fill a pot of water enough to just cover the chicken completely. If you are unsure of just how much water, put the chicken into the pot and fill until the chicken is just covered and then take the chicken out. Bring the water to a boil.
 Place the chicken into the water and bring the water to a boil again. Place the neck, liver, heart, or anything else that came with the chicken.
 Once the water is boiling, use thongs to lift the chicken from the inside cavity.
 Hold the chicken up and tilt slightly to drain the water from the inside cavity slowly. This is to ensure the water inside the raw cavity is drained and doesn’t get stuck inside uncooked.
 Place the chicken back into the water, ensuring water has filled the inside cavity. Bring the water to a boil again.
 Once the water has boiled, lower the heat to a slow simmer where one or two steams of bubbles are coming from the bottom of the pot.
 Put a pair of chopsticks over the top of the pot and then place the lid of the pot on top of the chopsticks. This helps to circulate the heat and keep an eye on the simmer. Simmer for 45 minutes.
 Place the chicken back into the pot and bring the water to a boil.
 Turn off the stove, take the chicken out of the water and onto a plate. Cover the top and bottom of the chicken with salt.
 Let the chicken sit for 20 minutes before serving. You can carve or cut, this is where the name white cut chicken came from. Or peel the chicken off the bone also known as shredding.
 A bonus is the nutritious broth from the boiled chicken. I usually boil 2 chickens (one after another) in the same broth which results in a delicious broth ready for drinking. If you only boil 1 chicken, you’ll need to add more bones to boil into a flavorful broth.
 Going out for dim sum is a very happy time for my family. We go as a multi-generation group from my grandparents to my children and we always go hungry because these are some of our favorite foods. Here is how I have an awesome dim sum experience.
 This can be somewhat cryptic because the dishes most likely have been translated exactly from their Chinese characters. Don’t be surprised if you see misspellings and no pictures. Here are some of my favorites that are worth trying.
 Shrimp dumpling
 Cilantro and Scallion rice roll. This is vegetarian but some have meat and they are all delicious.
 Bean curd skin roll
 Steamed spare ribs
 Sticky rice in lotus leaf
 Shanghainese Soup Dumplings
 Turnip cake with XO Sauce
 My mom is an amazing cook. Everything she makes is delicious. Since moving to the suburbs, having a family, and wanting to cook for them, I’ve tried to learn her recipes. Most Chinese moms (at least the ones I know) don’t write down recipes, they cook from memory. The direction I get from my mom on how to cook Chinese food is a list of ingredients and some order of instruction. From there, I reference cookbooks and do A LOT of recipe testing to get things to taste exactly how she makes them.
 Danielle Chang’s team gave me permission to share one of my favorite recipes from the Lucky Rice Cookbook, Sichuanese Chicken Wings. These chicken wings have so much flavor with an added kick from the hot chiles…yumm-my.
 Line a large rimmed baking sheet with aluminum foil and spread the chicken wings out on it. Sprinkle them generously with salt. I used Himalayan pink salt to pack in as many minerals.
 Bake for 45 to 50 minutes, until the wings are golden brown and crisp. Drain off the fat and transfer the wings to the a serving bowl.
 In a cast iron skillet set over medium-high heat, toast the red chile flakes, cumin seeds, Sichuanese peppercorns, and star anise, shaking the pan constantly, until the spices are toasty and fragrant, 2 to 3 minutes.
 Immediately pour them into a bowl to stop the cooking. Cool slightly, and then grind to a powder in a spice grinder or with a mortar and pestle.
 Pour the ground spice mixture on top of the chicken wings and toss with your hands (best tools in the kitchen).
 In the same dry skillet, toast the dried chiles, shaking the pan constantly, until they are darken in color and smell fragrant, 3 minutes. Then add the toasted whole chiles and the julienned ginger on top of the chicken wings.
 To serve, toss the wings, spices, and ginger with your hands. Taste, and add more salt if necessary. Sprinkle with the chopped cilantro and serve at once.
 Start your steamer. A steamer can be any pot with a secure lid and steaming grate (the metal disc in the middle of the water). The pot must be bigger then the plate your fish will steam on. The lid must be secure enough to create a steam chamber to cook the fish. The steamer in the photo is a wok and a mismatched lid that was secure enough to create the steam chamber.
 Place the ginger medallions 1 inch apart on the top and bottom of the fish. Cover the fish with the stemmed cilantro. The ginger and cilantro will flavor the fish while steaming.
 Place at least one piece of ginger inside the fish.
 When the water in the steamer is boiling, turn down the heat so the steam won’t burn you, then place the fish on the grate in the steamer. The water must touch the plate to cook the fish.
 Put the lid on top and turn the heat back to medium high. From one of my favorite recipe blogs,
  When the fish is cooked, turn off the heat. You will know it is cooked when the skin has started to tear a little and the meat is exposed. Too much tearing is a sign the fish is overcooked. Crack the lid to release the steam and stop the cooking process.
 To prepare the marinade, in a small pot or pan, heat up the fat/oil on medium heat. When it is hot, put in the ginger and garlic. They should instantly sizzle when they hit the fat/oil. Let them flavor the fat/oil for 1-2 minutes and should not turn brown.
 Add in the coconut aminos, fish sauce and sesame oil and let simmer for another 1-2 minutes. Add the scallions, salt, white pepper and after 30 seconds, turn off the heat.
 Sprinkle the cilantro leaves on top of the fish and then use a spoon to scoop the hot oil marinade all over, including the inside of the fish. Remember to pour some marinade on the cheeks because it is the best meat on the fish. Serve immediately.